Marking a Non-Hazardous Manifest as Received (For Facility Users)
While you can create and manage non-hazardous manifests 100% digitally, some users on the manifest may not be able to sign digitally, so the Facility must enter those signatures through the "Mark as Received" workflow.
Written by Ryan Battles
Updated on May 04, 2022
Mark as Received
As the waste industry is continuing to move to full-digital solutions, the Wastebits system has been designed to enable every company involved with a non-hazardous manifest to create a user account, log in, and sign the manifest digitally (Service Providers too!). At times, a printed manifest is a convenient way to gather signatures without requiring digital signatures.
In this scenario, the Waste Facility that receives the load has the ability to Mark as Received, entering all missing signatures and optionally uploading a PDF of the hand-signed manifest.
Note: The rest of this tutorial applies only to what a Waste Facility user can see when managing Manifests.
Draft Manifests
If the manifest is still in Draft mode due to the Generator not signing it digitally, a Waste Facility user can mark it as prepared on the Generator's behalf. In order to mark it as prepared, go to Manifests > Click on the desired Manifest in the list > and click the Mark as Prepared option in the Actions dropdown. This will enable the Mark as Received workflow.

Manifests with Missing Information
If you receive a manifest that is missing any of the following information, you will need to edit the manifest to include that information before the Mark as Received option is available:
- Transporter Company
- Container Information
- Quantity Information
Marking a Manifest as Received
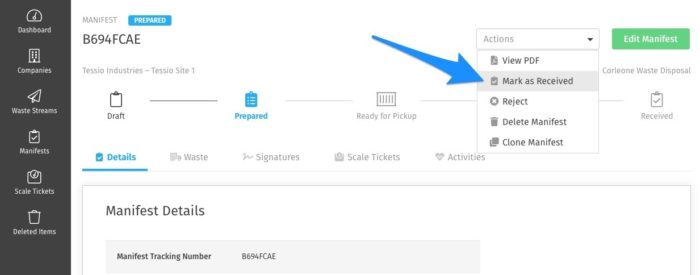
Once the manifest has reached the Prepared (The Facility user marked it as prepared) or Ready for Pickup (The Generator has signed it) statuses and any missing information has been added, you are now ready to mark the manifest as received. Navigate to the manifest you wish to Mark as Received and select that option from the Actions menu.
After clicking Mark as Received, you will see a pop-up window that allows you to indicate any discrepancies from the digital manifest to the signed manifest (optional), enter the signatures on the printed Manifest, and upload the attachment of the printed Manifest (optional).
Note: The Facility's Signature requires the signing user to have a Wastebits account. If the signatory on the manifest does not have an account, you will need to create one before being able to sign as that user. All other Signatures may be entered without an account.
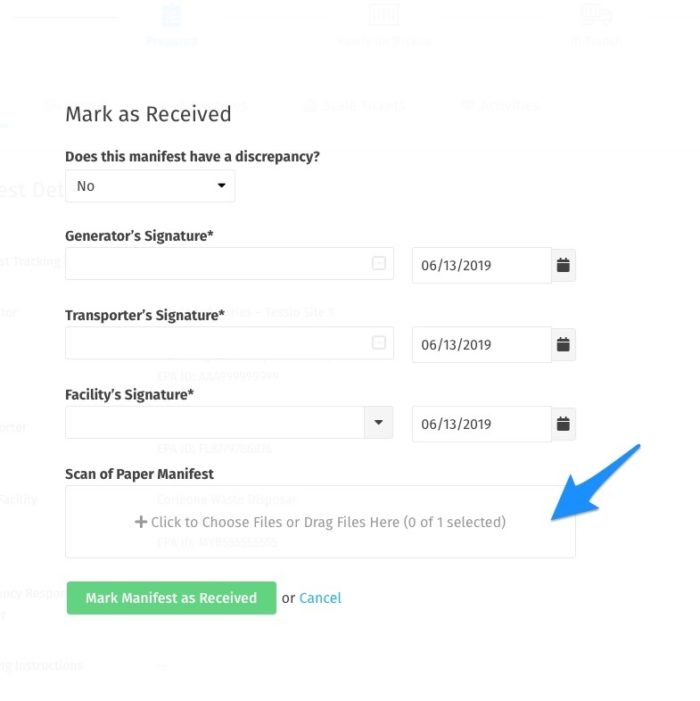
After filling out the information and providing an uploaded file, submit the form by clicking Mark Manifest as Received.
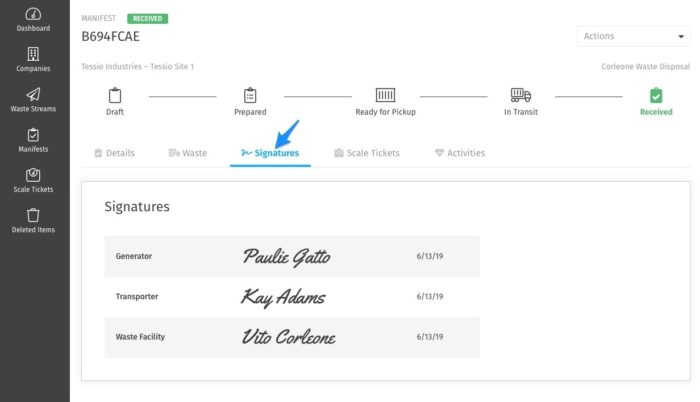
Viewing the Signatures
The Signatures tab of the Manifest Details page will now have records of the signatures and dates associated with the Manifest.
Viewing the Document
The scan of the paper Manifest is now accessible within the Manifest Details page by clicking in the Actions dropdown at the top of the page, as well as a link within the Details Tab next to Scan of Paper Manifest.
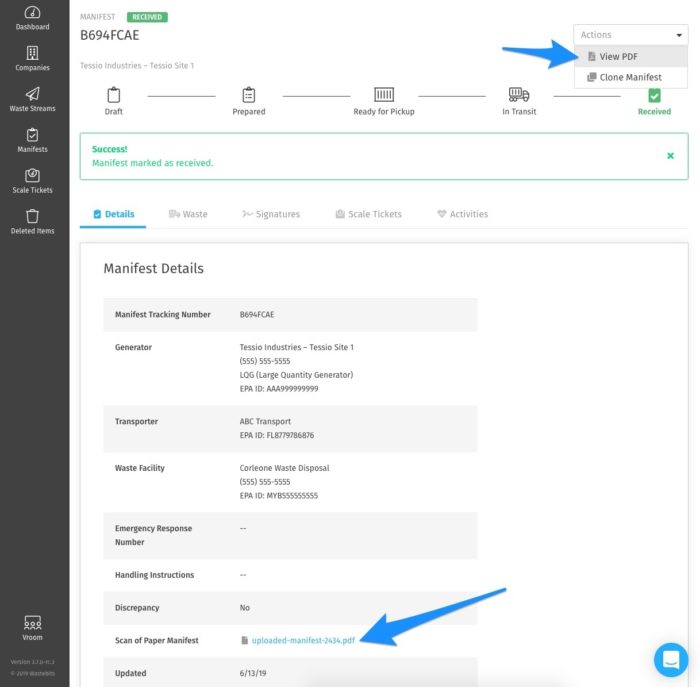
Note: If you elected to not add a scan of the manifest at the time you marked it as received, you may do so in the future from the details page.
Uploading a scanned Manifest is a convenient way to use a hybrid approach to digital manifesting that allows one or more parties involved with a Waste Manifest to sign a paper copy instead of logging in, while maintaining accurate digital records and all of the other benefits of a digital system.